Tuesday, February 25, 2014

SCCM 2012 R2: Report ‘Run’ Button Doesn’t Work

I know this is more a SCOM blog. Yet I do more besides SCOM so I want to share some of those experiences here as well, hoping to aid you.

Issue
SCCM 2012 R2 is installed and seems to be working just fine. On one of the SCCM servers the Site System Role Reporting Services Point is added. Soon a whole bunch of reports are uploaded to the SSRS instance. But none of the Reports will run. The Run button doesn’t do anything.
image

It gets even stranger. One can edit reports and run those reports from the editor without any issue at all. So it seems to be an isolated console issue.

Cause
After some investigation the culprit was soon found, thanks to the event log. The application log of the server where the Console is run from logs EventID 1, stating:
System.IO.FileNotFoundException\r\nCould not load file or assembly 'Microsoft.ReportViewer.WinForms, Version=10.0.0.0, Culture=neutral, PublicKeyToken=b03f5f7f11d50a3a' or one of its dependencies
image

Okay, that’s clear enough. Apparently the SCCM 2012 R2 Console requires the Microsoft Report Viewer 2010 Redistributable Package but it isn’t installed.

Solution
I downloaded the latest version which incorporates SP1, to be found here. Run the installation file, closed the SCCM Console, reopened it and now the Run button worked like a charm!

Recap 1
Further investigation tells me the Microsoft Report Viewer 2010 Redistributable Package should be installed by the installer of SCCM, but is sometimes skipped. This happened to me on a brand new Windows Server 2012 R2 box with SCCM 2012 R2, so it seems this issue can still occur, even when running the Latest & Greatest.

Don’t know yet whether the PowerShell Deployment Toolkit solves this issue.

Recap 2
I just learned it isn’t required to download the Microsoft Report Viewer 2010 Redistributable Package. Instead it can be found on the same server/desktop experiencing this issue. The folder C:\Program Files (x86)\Microsoft Configuration Manager\AdminConsole\bin contains the file ReportViewer.exe. Run it and the wizard will install it for you. Close and reopen the SCCM Console and you’ll be just fine.

Thursday, February 20, 2014

System Center 2012: All The Cmdlets You Wanted To Know But Were Afraid To Ask

Microsoft has released documents containing ALL the Cmdlets available for ALL the System Center 2012 components.

Since System Center 2012 is PS driven (SCVMM being the big example here!) there is a HUGE collection of cmdlets:
image 

You can download them from here.

Wednesday, February 19, 2014

Free Download: Windows Azure Symbol/Icon Set

Microsoft has published a free symbol/icon set for Windows Azure. This set can be used with Visio and PowerPoint for example.
image

The same zip file contains all symbols and icons as PNG files as well, so you can use them for other applications as well. Download the zip file from here.

New Free eBook: Building a Virtualized Network Solution

Microsoft has released an new FREE ebook all about Microsoft System Center: Network Virtualization and Cloud Computing.
image

Ebook is available in PDF, ePub and Mobi format and can be downloaded from here.

Friday, February 14, 2014

Free MVA Live Event: Virtualizing Your Data Center With Hyper-V & System Center

On February the 19th MVA runs a FREE live event all about Virtualizing Your Data Center with Hyper-V and System Center.
image

Taken directly from the website:
‘…If you're new to virtualization, or if you have some experience and want to see the latest R2 features of Windows Server 2012 Hyper-V or Virtual Machine Manager, join us for a day of free online training with live Q&A to get all your questions answered. Learn how to build your infrastructure from the ground up on the Microsoft stack, using System Center to provide powerful management capabilities…’

This event will be presented by Microsoft virtualization experts Symon Perriman and Matt McSpirit .

Topics presented during this event:

  • Introduction to Microsoft Virtualization
  • Host Configuration
  • Virtual Machine Clustering and Resiliency
  • Virtual Machine Configuration
  • Virtual Machine Mobility
  • Virtual Machine Replication and Protection
  • Network Virtualization
  • Virtual Machine and Service Templates
  • Private Clouds and User Roles
  • System Center 2012 R2 Datacenter
  • Virtualization with the Hybrid Cloud
  • VMware Management, Integration, and Migration

Wow! I want to attend that event but I can’t. Now what?
Good one! But Microsoft takes care of you since they state: Even if you cannot attend the live event, register today anyway and you will get an email once we release the videos for on-demand replay!

Want to know more or, even better, register?
image

Thursday, February 13, 2014

SQL Server + System Center 2012 + Windows Server 2012

When designing good System Center 2012 environments it’s obvious that SQL Server is key to the overall success of your design, implementation and functionality of it all.

When a bad decision is made or a good design decision is poorly executed, it has a direct negative impact on the overall experience and functionality of your System Center 2012 environment.

SQL Server 2008 R2 and Windows Server 2008 related to System Center 2012
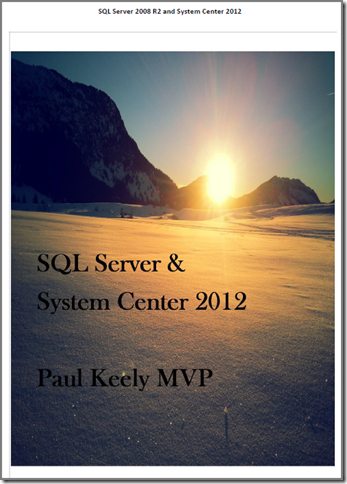
Gladly Paul Keely – a highly experienced System Center 2012 professional - realized this and decided some time ago to write down his experiences related to SQL Server for System Center 2012 in the guide SQL Server guide for System Center 2012. That guide had a strong focus on SQL Server 2008 R2. I’ve uses that guide a couple of times and learned a lot from it.
image

SQL Server 2012 and Windows Server 2012 R2 related to System Center 2012
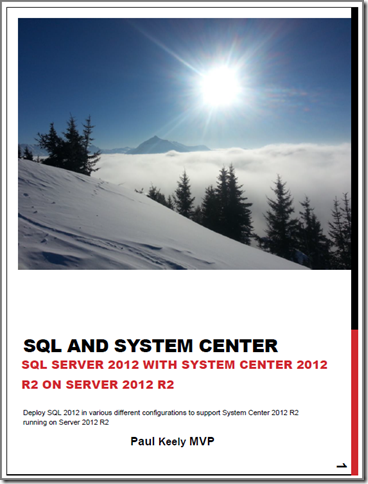
However, as time moves on newer versions of SQL Server and Windows Server came to be. So Paul Keely decided to write an extension to the other guide (even though it can be looked upon as a stand alone guide as well), focused on SQL Server 2012 and Windows Server 2012 R2. This guide is titled SQL 2012 and System Center 2012 R2.
image

Even SQL Azure is covered!
This latest guide came to be with the help of Pete Zerger and Robert Hedblom who did sections on SQL in Azure for System Center and backup for SQL with DPM.

So for anyone involved in designing, rolling out, maintaining System Center 2012 technologies, both guides are a must have and read. And you know what? Both guides are FREE!

Credits
A big word of thanks to Paul Keely, Pete Zerger and Robert Hedblom for their contributions to the community.

Wednesday, February 12, 2014

Windows Server 2012 R2: How To Create A SCOM Certificate Template

Even though I’ve blogged about it already for Windows Server 2008 R2, the posting requires some updates for Windows Server 2012 R2. Also the same posting contains referrals to other postings of mine in order to address certain issues.

In this posting I have put everything together for Windows Server 2012 R2, so it’s a ‘One-Stop-Shop’ without the need to go somewhere else. There is much to tell, so let’s start.

Step 1: Creating the template on the Enterprise CA server.

  1. Go to Start > type CMD <enter> type MMC <enter>  File > Add/Remove Snap-in > select Certificate Templates and Certification Authority (local computer) > OK.
  2. Select Certificate Templates, in the Console click with right mouse button on IPSec (Offline request) and select Duplicate Template. On the first tab, Compatibility copy underneath settings.
    image
  3. Tab General. Give this template a name which makes sense. Adjust the validity period so it adheres to the security policy of your company.
    image
  4. Tab Request Handling. Set Purpose to Signature and encryption. Select the option Allow the private key to be exported.
    image
  5. Tab Cryptography. Set Minimum key size to 1024 and select as Providers Microsoft Enhanced Cryptographic Provider 1.0 and Microsoft RSA SChannel Cryptographic Provider.
    image
  6. Tab Extensions. Select Application Profiles > Edit.
    image

    Remove the Application policy which is present by default and replace it with these two other Application policies: Client Authentication and Server Authentication.
    image
  7. Tab Security. Here you have to check the settings for the Authenticated Users. They must have Read access:
    image
  8. Now you need to add the computer account of the CA where also the web interface for the CA is run from, in this example the DC01 server. This computer account requires Read and Enroll permissions. Otherwise this new template won’t show up in the web interface of the CA.

    Add > Object Types > select Computers > OK > enter the name of the CA > Check Names > OK > select this computer account and set the proper permissions (Read and Enroll):
    image
    > Apply > OK.

Step 2: Adding the template to the CA
Now the template created in Step 1 needs to be added to the CA. This is done from the same MMC.

  1. In the MMC, go to Certification Authority > collapse this node  > click with right mouse button on Certificate Templates > New > Certificate Template To Issue.
    image
  2. Select the certificate template you created in Step 1 > OK.
    image
  3. Double click on the folder Certificate Templates. All the available templates will be shown, among them the SCOM Certificate template:
    image
  4. Close the MMC.

So now we have a new SCOM certificate template which will be available for in the web interface of the CA as well. However, one step remains because otherwise the web interface might not work because of security restrictions set in IE.

Step 3: Modifying the security settings in IE on the CA server with the CA web interface

  1. Start IE with elevated permissions and surf to http://localhost/certsrv;
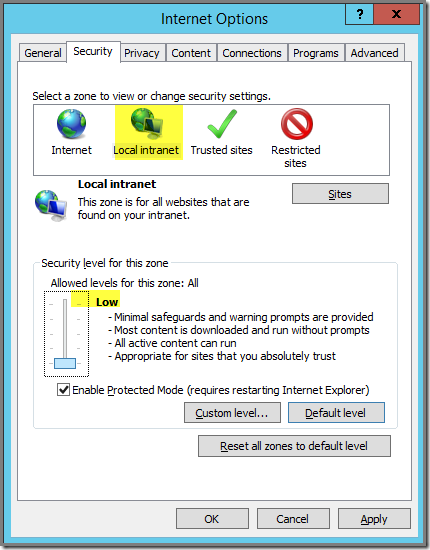
  2. Go to Internet Options > Security > Local Intranet > Sites > Advanced > Add this website to the zone http://localhost/certsrv > Add > Close > OK;
    image
  3. Set the Security level for this zone to Low
    image

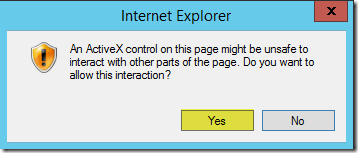
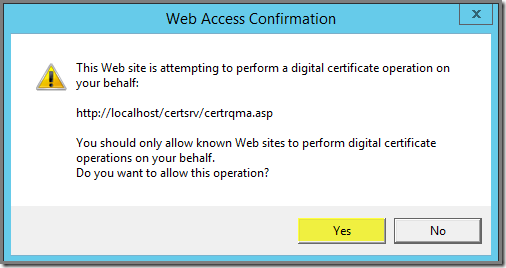
Now you can submit your certificate requests without any issues after you answer these two questions – every time when they pop up – with YES:
image

And:
image

Additional advice & tricks
When requesting a SCOM certificate life has become much easier now with this certificate template. None the less, there are still some small things to reckon with, during and after the certificate is requested. Some of these items might seem like kicking in open doors, but you’ll never know.

  1. After having selected the proper certificate template
    image
    there are only TWO fields which require attention:
    The Name field under the header Identifying Information For Offline Template:
    image
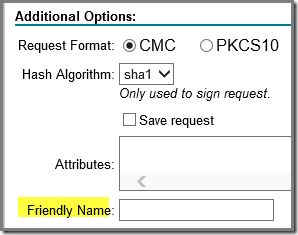
    And the Friendly Name field under the header Additional Options:
    image

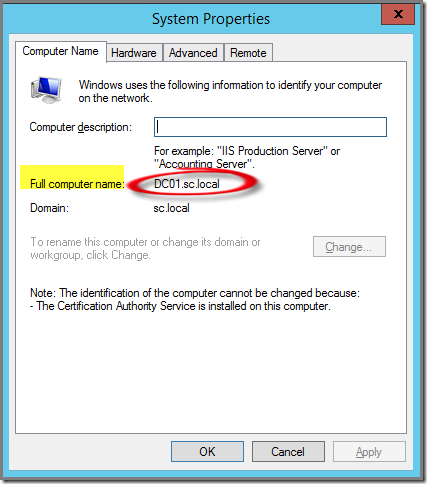
    As a Best Practice, use for BOTH fields the Full Computer Name of the server where this certificate is meant for. When you don’t the certificate won’t match with that system, resulting in an wrong certificate that won’t work.

    How to find the Full Computer Name? On that system go to the system > right click > Properties > Advanced System Settings > tab Computer Name and here you’ll find it:
    image
    Never presume but ALWAYS check, especially for the DMZ systems. This prevents cert mishaps which can cost you a lot of time to solve.

  2. At the end of the request you can install the certificate on the same server where you ran the request from. This is okay but don’t forget to export it. In order to do that start a MMC instance, at the Certificates snap-in and select your user account. Export the certificate WITH the private key and you’ll be just fine. Follow the wizard all the way through.

  3. Never forget to import the root certificate of the CA which issues the certificate for that system. Otherwise the certificate won’t be trusted. How to obtain that root certificate? Easy:
    Open the web interface of the CA > select Download a CA certificate, certificate chain, or CRL > select Download CA certificate chain > Save.

  4. On a non-trusted system this is the order of things:
    1. Request certificate based on Full Computer Name;
    2. Install it;
    3. Export it with Private Key;
    4. Import the Root certificate on that system;
    5. Import the certificate for that system;
    6. Check the presence and status of that certificate in the personal certificate store for that computer account;
    7. When okay, install the Agent manually;
    8. Create two Rules on the Windows Firewall, both TCP 5723 one for incoming and the other for outgoing;
    9. Run the tool MOMCertImport.exe in order to connect the SCOM Agent with the certificate;
    10. Approve the installed Agent on the Management Server (don’t forget to install certificates on that server as well).

Tuesday, February 11, 2014

Cross Post: Enabling Agent Proxy For Once And For All

Kevin Holman just posted this article on his blog about how to enable the default Proxy setting for new Agents to be deployed. This way all new Agents will have their proxy enabled by default. Nice!

Want to know more? Go here.

SCOM 2012 & Maintenance Mode: Finally Fixed!

SCOM rocks but has some issues as well, one of them being MM
As we all know is Maintenance Mode (MM) in SCOM – ANY version – a pain in the backside. Excuse my ‘French’ but that’s what it is.

On one hand we MUST use MM in order to prevent alert storms and for running proper availability reports for the management. When MM is used in a proper manner, planned MM won’t have a negative effect on those same reports.

So this makes proper usage of MM very important. But on the other hand, the way it’s taken care off by default in ANY version of SCOM is outright bad. Nowhere is the ability present to plan MM from a proper interface. Thanks to the effort of the community many PS scripts are available, allowing you to perform a basic task: PLANNING MM ahead of time.

We hear you but we run a different agenda
Yes, many persons, communities and companies have complained about it since SCOM 2007 hit RTM up to SCOM 2012 R2. But never has this issue been properly addressed by Microsoft. Oh yes, we’ve got Orchestrator. And Microsoft wants all of us to use it so why not build a runbook for it?

The car and the parking lights
To me it sounds the same like buying a car and asking where the parking lights are. Yes, they’re present but in order to use them you have to get out of the car, crawl underneath it and press a couple of buttons. And when you want more comfort for using this functionality, you have to buy yourself additional hardware…

The community and Microsoft
As stated before in order to address this issue in SCOM many people in the community stood up and tried to solve it. Some solutions were okay where others were really good, like Tim McFadden’s SCOM Remote Maintenance Mode Scheduler for SCOM 2007x.

At a certain point in time Microsoft tried to address the MM issue by building a tool themselves. It involved an additional MP and an interface outside SCOM. However, even though the effort on itself was good, the result wasn’t good at all. The solution wasn’t scalable and introduced issues in SCOM 2007x environments when used at scale.

Along came SCOM 2012x
Yes, SCOM 2012x has many improvements compared to SCOM 2007x. Sadly MM isn’t one of them. It’s a copy of the crappy MM interface present in SCOM 2007x Sad smile.

And no, Tim’s old tool – which IMHO is the best – doesn’t work with SCOM 2012x since the SDK service is totally rewritten. So no luck there?

Time to meet the NEW tool made by Tim!!!
Wow! This really rocks! Tim has taken the time to rewrite his super duper SCOM Remote Maintenance Mode Scheduler tool for SCOM 2012, resulting in the SCOM 2012 Maintenance Mode Scheduler tool!!!
image

I’ve had the honor and privilege to test some beta versions. During these tests I was already deeply impressed by the way this tool is made and how it works. Compared to the SCOM 2007x tool this version has really grown up, like moving from a functional Ford to a BMW!

The installation is a walk in the park and the tool has a sharp looking interface which is highly intuitive. With a few mouse clicks MM is scheduled, either for computers, Groups or Classes. MM becomes what it should have been from the very beginning: a next, next, finish experience with 100% results. A ‘Set & Forget’ experience.

It’s clear to see that Tim has started from scratch! Awesome!

Free?
No, this tool comes with a price tag. But a very reasonable one. And the explanation is straight forward. Tim want’s to show the world he’s in for the real deal. With the previous versions many persons asked for additional functionalities or reported some minor bugs.

Eventually this lead to a new version of that tool, version 2. But that new version took a long time to get there simply because everything had to be made in his own spare time. I’ve met the guy a couple of times and even though he’s a hero with writing code, it seems to me he has a private life as well Smile.

So now with this newest version of this tool, rewritten from the ground up, he has decided to license it. In total there are three types of site licenses. The only difference between the three site licenses is the coverage for free updates. The basic site license covers free updates for one year, the second type of site license covers free updates for two years and the latter site license covers free updates for unlimited time.

Top dollars?
No, not at all! When looking at how the tool works (fast, stable, reliable and easy) and the coverage (there is even a Windows 8 app for it!) the pricing is highly affordable. The most basic license will have a ROI within a month at most, looking at how fast this tool works and prevents mishaps.

Okay! I want to TEST it!
Good news! There is a 30 day FREE trial of the tool available for download. You can download it from Tim’s website. On the same website you can read all about this tool, how it works and look at screenshots of it, so you know that I am NOT exaggerating about it.

Download the trial version, install it, experience it and buy it. That’s all I can say about this tool.

Monday, February 10, 2014

OM12x Distributed Application Horror: Health DOES NOT Rollup. How To Tame The Beast…

Issue
Have seen this happening multiple times. A DA is created using one of the highlighted DA templates and one of the DA components gets into a critical state but the DA itself doesn’t reflect that. Instead it stays in an Healthy state
image

Example
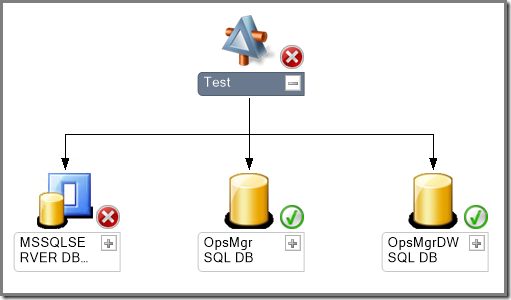
I’ve created a sample DA - using the Blank (Advanced) DA template - consisting out of three components, reflecting the SCOM 2012 R2 SQL databases and the related SQL DB Engine:
image

I haven’t added any relationships. IMHO these don’t add any real value and only introduce clutter. This DA is titled Test.

When saved it soon gets a status which depicts the issue of this posting:
image

As you can see, the DA Component MSSQLSERVER DB Engine has a critical state. And yet, the DA itself (TEST) has a Healthy condition. And no, this WON’T change after some time at all. So there’s something else at play here.

Time to investigate
Let’s open the Health Explorer since this way we’re going to see more detail about the monitoring itself.

Health Explorer for the DA Component MSSQLSERVER DB Engine (filter removed):image

This looks good. The top level entity (Entity) get’s it health state from ALL four well know Aggregate Monitors (Availability, Configuration, Performance & Security). That is, when the Unit Monitors rolling up to those Aggregates are present AND turned on.

So far so good. Two Unit Monitors rolling up to the Aggregate Monitor Performance are in a critical state, rolling all the way up to the top level entity itself. Nice! No issues here. Monitoring is taking place as expected.

The cause
So the reason why the DA Test doesn’t reflect this state is somewhere higher up in the chain.Time to check the Health Explorer for the DA Test itself (filter removed):
image

Uh oh. This doesn’t look good at all. I want the DA to reflect the status of ALL Monitors no matter to what Aggregate Monitor they rollup to. Only to have the Aggregate Monitor Availability enabled is far too limited. So apparently we’re getting closer to the cause here.

But be careful now, because you might be tempted to make the wrong call here.

Some levels lower of the Aggregate Monitor Availability there is a Dependency Monitor taking all other Monitors used by the DA components into account, like this:
image

As you can see this Dependency Monitor, titled Blank Distributed Application Health Roll-up – Test (Blank), has no status. So all Entity Health states as depicted in the same screenshot don’t have any effect what so ever, even though they themselves do have a status.

And when you take a deeper look under the same Dependency Monitor, this is what you’ll find:
image

At this point you might be tempted to make the wrong decision here by enabling the Dependency Monitor Blank Distributed Application Health Roll-up – Test (Blank) through an Override (Enabled = True).

But that’s not the way to go at all!!!

Why?

There are many reasons for it. The most import ones however are:

  1. Many of the Unit Monitors rolling up to this Monitor are already rolling up to the Dependency Monitor All Contained Objects. So much of the monitoring will be happening twice. Which is bad.
  2. The Aggregate Monitors Configuration, Performance and Security will stay stateless since everything rolls up to the Aggregate Availability. And sooner or later the people using this DA will start complaining about it and they’re right. They want to see what goes wrong on what level, whether it’s Availability, Configuration, Performance or Security. Everything rolling up to Availability is a bad call.

The ONE & ONLY Solution
The ONLY way to go about it, is to build the missing Dependency Monitors, one for every three remaining Aggregate Monitors (Configuration, Performance & Availability).

That way all will be just fine. You can even choose to do so for every DA component involved – which takes more time – but you can also choose for the more relaxed way where you built ONE Dependency Monitor per Aggregate Monitor to which all related Unit Monitors of all DA Components rollup to.

Example
In this case I have the DA test and opened it in another View in the SCOM Console. Simply close the Health Explorer and go to Authoring > Management Pack Objects > Monitors > Change Scope > View all targets > Clear All and select only the DA having these issues. In my case it’s the Test DA. Now you’ll see something like this:
image

The fact that Availability has a white triangle pointing to the right means only this Aggregate Monitor does actually have a rollup. The other Aggregate Monitors don’t and depict a black triangle instead. Time to change it Smile.

But let’s first take a better look at the Dependency Monitor we want to recreate.

  1. Expand Availability > double click the Dependency Monitor All Contained Objects > check the tab Monitor Dependency and take note of the Object it depends on:
    image
    The same Object (the second Object (Membership) in this case) will be used when we’re going to create our own Dependency Monitors.
  2. Do the same for the tabs Health Rollup Policy and Alerting. Also note their settings. Now we have enough information to start. In this example I’ll build the Dependency Monitor for Performance since that’s the one with a Critical state not rolling up to my DA Smile.
  3. In the same part of the Console (Authoring > Management Pack Objects > Monitors and your selected DA) click right on the Aggregate Monitor Performance > Create a Monitor > Dependency Rollup Monitor;
  4. Because you started this wizard from the Aggregate Monitor Performance of the proper DA, the fields Monitor Target, Parent Monitor will be filled out already for you:
    image
    Enter a proper Name, adhering to your naming conventions and select the SAME MP as where the DA resides. Now your screen looks like this:
    image
    > Next;
  5. Select the same Object as found in Step 1 but now you select the Aggregate Monitor Performance
    image
    > Next;
  6. Select the same Health Rollup Policy (Worst state of any member) > Next and configure the Alerts (none) > Create.
  7. Now the Dependency Monitor will be created and soon SCOM will be ready. Wait a moment and then open the DA again in Diagram mode:
    image
  8. Open Health Explorer for the top level entity:
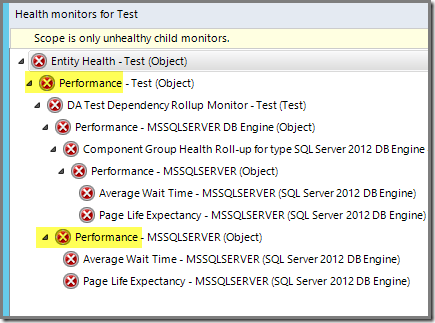
    image
    Looking NICE! Let’s remove the filter:
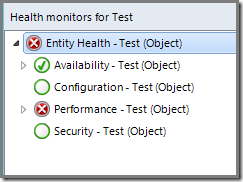
    image
    As you can see, the Aggregate Monitor Performance has a state now for the top level entity. AWESOME!
  9. Repeat Steps 3 to 6 for the Aggregate Monitors Configuration and Security as well. This will result in these Aggregates rolling up to the top level entity of the DA as well (many times the Aggregate Monitor Security doesn’t get a status since there aren’t any Monitors rolling up to it, so don’t be disappointed).

Recap
Since SCOM 2012x the DAs are said to rollup to ALL 4 Aggregate Monitors. However, the three highlighted DA templates come from SCOM 2007 R2 and aren’t ported to the new world.
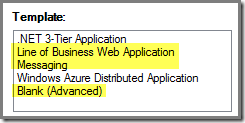
image

This results in wacky DAs breaking down the overall experience. The .NET 3-Tier Application DA template however works (PARTIALLY!) as intended with SCOM 2012x since this is a new DA template introduced for APM which is new in SCOM 2012x.

However, the same template isn’t really nice since it throws in naming schemes which aren’t that good and seems to have an issue with the Aggregate Monitor Availability which is disabled by default.

Therefore I prefer to build my own DAs using the Blank (Advanced) DA template WITH creating the three missing Dependency Monitors for the three Aggregates later on. That way I am totally in control of what’s happing Smile  without taking a deep dive into MP authoring tooling outside the regular SCOM Console.